Blueprint Design
What is a Torque blueprint?
A blueprint is a template for provisioning an environment that contains references to different IaC Components ("Grains") that together define the applications, cloud infrastructure, networking and policies that make up a specific environment to be deployed. Blueprints are stored as source-controlled YAML files, and each grain in a blueprint is a reference to one IaC or automation file (for example, a Terraform module or a Helm chart) that will be deployed as part of the environment, and the component's designated inputs, outputs and execution information.
A blueprint also contains the orchestration between the grains (provisioning order and dependencies, shared parameter storage, environment duration policies, tag values, etc.), and when launched, deploys a whole environment, from the infrastructure layer to the application itself.
You can have Torque discover (i.e. generate) blueprints out of your existing Terraform, Helm, CloudFormation, or other supported IaC assets, or you can develop more sophisticated blueprints that deploy a complex environment comprising multiple grains and/or nested blueprints.
Option A: Let Torque generate blueprints from your assets
When developing a new blueprint, Torque provides you with the ability to automatically discover the different IaC and Automation assets in your connected source control repository, and generate a blueprint for a single asset (or generate multiple single-asset blueprints in one go).
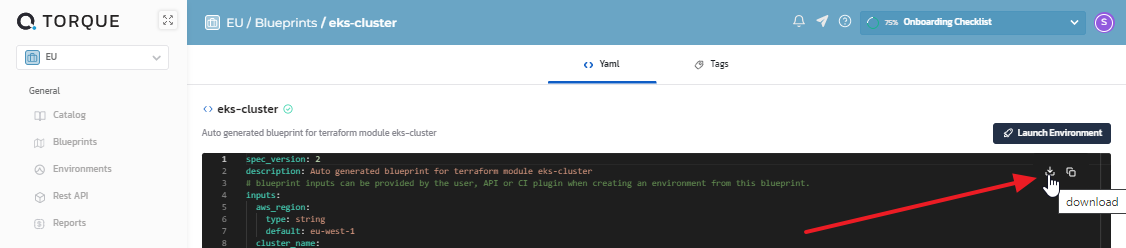
These generated blueprints are stored in Torque's backend, and you can customize their inputs, outputs and other details as needed inside an embedded VSCode style IDE from within the Torque Portal. For details on what you can do with generated blueprints, see Auto-generated Blueprints.
- In your space, go to Settings > Repositories and discover your assets.
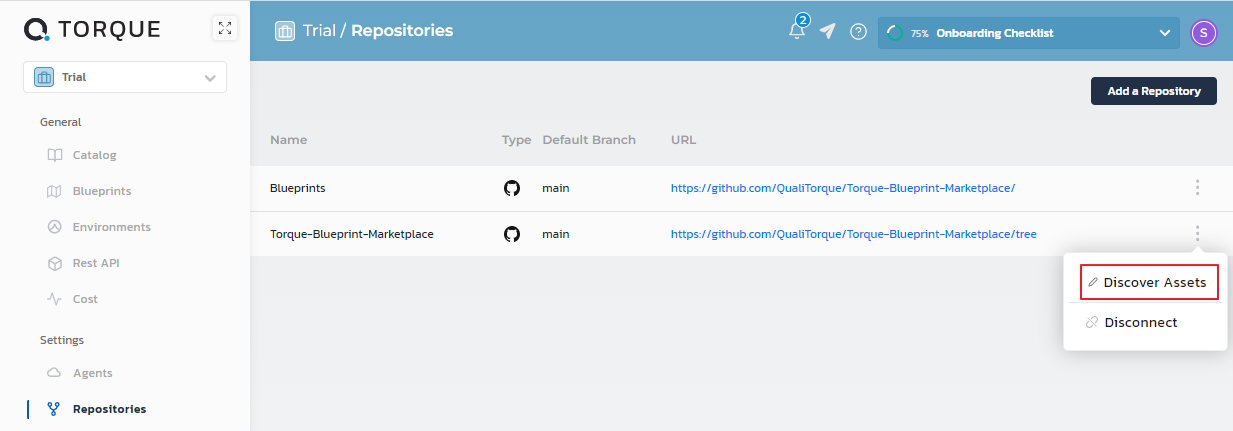
- Select one or more assets you want Torque to discover and click Generate Blueprints.
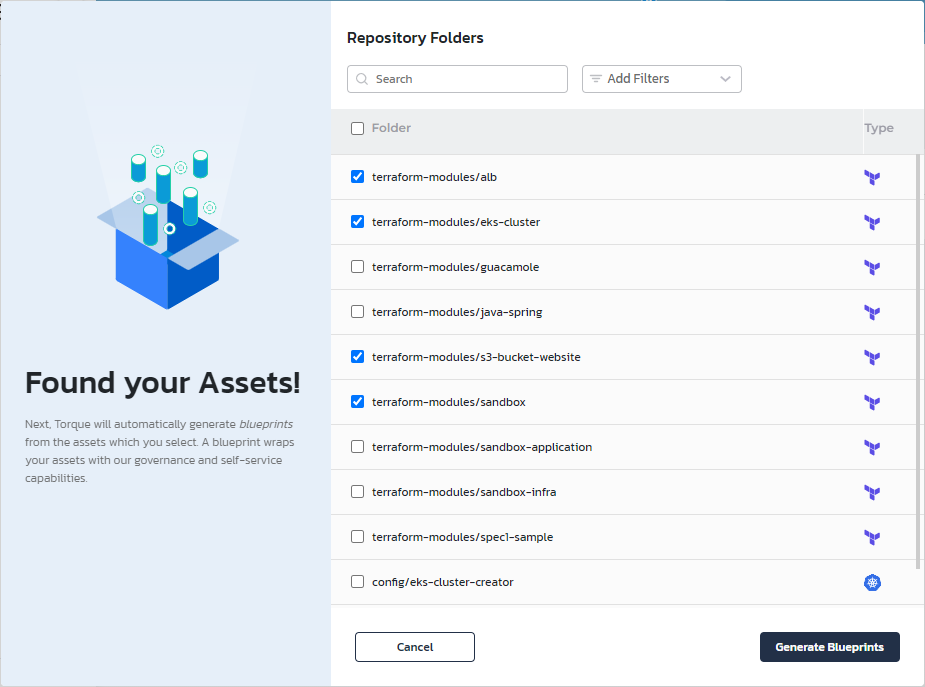
Torque creates a blueprint YAML for each selected asset, and lists the blueprints in your space’s Blueprints page.
-
You can click the blueprint to open it in the embedded VSCode editor. In this editor you can view the blueprint's contents, modify it, preview changes after modification, save the changes, and launch an environment from the blueprint.
-
(Optional) You can set the blueprint's max duration policy, default duration, attach labels and colors to visually group blueprints according to shared characteristics, or set the blueprint's tag values.
-
Publish the blueprints to your space's catalog and you’re good to go.
You and your space’s users can now launch environments from these blueprints via the Catalog.
Option B: Create a multi-asset blueprint in your source control repository
So far, we’ve learned how to create single-asset blueprints via auto-generation. But what if you want to create an application-stack environment? This is easily done by having multiple grains in a single blueprint or nesting an existing blueprint within a master blueprint as a grain. To create such a blueprint, you will need an IDE environment that has access to a clone of your repository, in which you can create the new blueprint's YAML file and edit it, and then commit it into your repository and push the changes to the remote repository from which Torque will automatically synchronize the new blueprint.
By enforcing usage of a source control repository, each blueprint in Torque will have:
- A full history of tracked changes
- The ability to identify which developer authored those changes
- The ability to retrieve or rollback to the contents of previous versions of the blueprint file
- If you are using VSCode to create and edit your blueprint file, we recommend using our official VSCode plugin (link here). For other IDEs, you can download our official JSON schema for the blueprint YAML and enforce it with your plugin of choice.
- When connecting a repository containing blueprint files to Torque, it is possible to reference a branch of the repository and not its main, allowing designers the ability to test changes to blueprints before pushing them to the main/master branch and affecting the production catalog.
To create a multi-asset blueprint:
- Generate a single-asset blueprint for the first grain in your blueprint, as explained in Let Torque auto-generate blueprints from your assets.
- Download the blueprint as a file from Torque.
- Save the file in the "/blueprints" folder in your cloned repository (create it if it doesn't exist) and rename it to the name of the new blueprint.
- Modify the grain type and spec to reflect the new component of your environment. For example:
grains:
  database:
    kind: terraform
    spec:
      source:
        store: infra
        path: terraform/rds
- For each additional grain, do one of the following:
- Copy an example of that grain from a generated blueprint.
- Use the sample structure for that grain type in the corresponding page in The Blueprint YAML.
- If grains depend on each other, add a
depends-onsection to the grain (in the top level, next tokind:andspec:) and provide the names of the dependent grains in a comma-separated list. - Once a grain depends on another grain, the output values from that grain can be used as values for any of the grain's inputs or attributes using the syntax
{{ .grains.grain_name.outputs.output_name}}, see the examples below. - Customize the
inputsandoutputssections of the blueprint to contain only the relevant inputs that the entire environment needs, and to reflect the outputs from the grains that you would like to make available to the environment's end-user.
Removing a blueprint
As mentioned above, there are two types of blueprints, auto-generated blueprints (stored in Torque) and source-controlled blueprints (stored in your repository).
- To delete a stored-in-torque Blueprint, in the Blueprints tab, click on the Blueprint and then click the Delete button on the top right corner.
- To delete a "repository" Blueprint, simply delete the blueprint file from the repository's branch that the Torque space is connected to.
Example multi-grain blueprint 1: Helm Application with MySQL and S3 Deployed by Terraform
This blueprint is available in the Sample space here, which deploys 2 Terraform modules and a Helm chart:
spec_version: 2
description: Robotshop microservices application deployed on K8S with Helm and RDS deployed with TF

outputs:
  WebsiteUrl:
    kind: link
    value: 'https://portal.qtorque.io/static/demo-quick-links/stans-robot-shop.html'


grains:
  mySqlDB:
    kind: terraform
    spec:
      source:
        path: github.com/QualiTorque/samples.git//terraform/rds
      agent:
        name: eks-demo
      inputs:
        - sandbox_id: '{{ sandboxid | downcase }}'
        - size: small
        - allocated_storage: 20
        - db_name: demo_db
        - engine_version: 8.0.26
        - engine: MySQL
        - username: adminuser
        - vpc_id: vpc-02e3bca90b081cd0f
        - region: us-east-1
      outputs:
        - hostname
        - connection_string

  s3Bucket:
    kind: terraform
    spec:
      source:
        path: github.com/QualiTorque/samples.git//terraform/s3
      agent:
        name: eks-demo
      inputs:
        - region: eu-west-1
        - acl: public-read
        - name: 'robotshop-s3-{{ sandboxid | downcase }}'
      outputs:
        - s3_bucket_arn

  robotShopMicroservices:
    kind: helm
    depends-on: mySqlDB, s3Bucket
    spec:
      source:
        path: https://github.com/QualiTorque/samples.git//helm/robotshop
      agent:
        name: eks-demo
      inputs:
        - hostname: 'robotshop-{{ sandboxid | downcase }}'
        - version: 0.4.3
        - connectionString: '{{ .grains.mySqlDB.outputs.connection_string }}'
        - objectStore.s3BucketArn: '{{ .grains.s3Bucket.outputs.s3_bucket_arn }}'
        - redis.storageClassName: gp2
Example multi-grain blueprint 2: Web-game on S3 (using CloudFormation and Terraform)
spec_version: 2
description: "S3 Bucket creation with Input and Output parameters"

inputs:
   Access Control:
      type: string
      description: >
        Type of access to configure on Bucket objects: Private, PublicRead, PublicReadWrite, AuthenticatedRead,
        LogDeliveryWrite, BucketOwnerRead, BucketOwnerFullControl, or AwsExecRead
      default: "PublicRead"
      allowed-values: ["Private", "PublicRead", "PublicReadWrite"]
   Bucket Name:
      type: string
      default: my-bucket-test
   AWS Region:
      description: "The name of the AWS Region to use"
      default: "us-west-1"
      allowed-values: ["us-west-1", "us-west-2", "eu-west-1"]

outputs:
   S3 Bucket ARN:
        value: '{{ .grains.my-S3-Bucket.outputs.Arn }}'
   S3 Bucket Domain Name:
        value: '{{ .grains.my-S3-Bucket.outputs.DomainName }}'
        kind: link
   Webgame Link:
        value: '{{ .grains.S3-Upload-Webapp-File.outputs.website_link }}'
        kind: link

grains:
  CFN-S3-Bucket:
    kind: cloudformation
    spec:
      source:
        store: assets
        path: assets/cfn/s3/AWSS3Bucket.yaml
      region: '{{ .inputs.["AWS Region"] }}'
      agent:
        name: demo-prod
        service-account: app-sa
      inputs:
        - AccessControl: '{{ .inputs.["Access Control"] }}'
        - BucketName: '{{ .inputs.["Bucket Name"] }}-{{ sandboxid | downcase }}'
      outputs:
         - Arn
         - DomainName

  S3-Upload-Webapp-File:
    kind: terraform
    depends-on: CFN-S3-Bucket
    spec:
      source:
        store: assets
        path: assets/terraform/s3-deploy-webapp
      agent:
        name: demo-prod
        service-account: app-sa
      inputs:
      - bucket_name: '{{ .inputs.["Bucket Name"] }}-{{ sandboxid | downcase }}'
      - region: '{{ .inputs.["AWS Region"] }}'
      outputs:
      - website_link