SSO Configuration
With just a few simple steps, your organization’s employees can log into Torque with their corporate accounts using SSO.
SSO integration provides enhanced security and significant cost-savings as you no longer need to manage your user accounts in Torque and your employees don’t need to remember another set of credentials. Quick, easy and hassle-free.
This is done by integrating your organization's identity provider with Torque's identity management system. Torque uses Okta for identity management and supports integration with all identity providers (IdPs).
In this article:
- How this works
- Integrating your IdP with Torque
- Associating a user to multiple spaces
- Mapping Torque user groups to IdP groups
- User provisioning with SCIM
How this works
- Your Idp admin creates an application on your IdP that defines the relevant users, as explained in the section below.
- We map your IdP's client application to Torque's identity management and provide you with an SSO-enabled account.
- A member of your organization uses this account to log in.
- The user is redirected to Torque's Corporate Account SSO (Single Sign On) login page.
- The user enters their corporate email address and password.
- We authenticate the user against your IdP and grant access to Torque.
Integrating your IdP with Torque
-
On your IdP, create a new client application.
-
In the application, do the following:
- Include the users that will access Torque.
- For each user, specify the following:
- space_name: Torque Space in which the user will operate.
- space_role: User's role in that space, as defined in Administration > Roles > Space Roles. To add a user to multiple spaces, see Associating a user to multiple spaces section below.
- (Optional) timezone : The user's timezone in IANA format (https://en.wikipedia.org/wiki/List_of_tz_database_time_zones)
-
Save the application.
-
Copy the relevant details from the application. These may change depending on your IdP - see this Okta help article for details. For example, these are the details for SAML 2.0:
- IdP Issuer URI
- IdP Single Sign-On URL
- IdP Signature Certificate
-
Go to Configuration > SSO Login or go to the Quali Support Center and add a new ticket, requesting SSO integration:
- Click + Add in the top left corner.
- From the Requester drop-down list, select Torque.
- From the Form drop-down list, select Torque Support Request.
- Enter a Subject. For example: "SSO integration for Quali", and in the description, request SSO integration, and provide the names of the custom user attributes and the application details.
- Click Submit.
Once SSO integration is set up, the application’s users will be able to use your SSO-enabled account to log in to Torque, as explained in Login to Torque.
NOTE: When the user first logs in via SSO, Torque sets up the user's profile, including contact details, space associations and space/account role settings. However, it is possible to update the user's profile on subsequent SSO logins as well. For details, contact Torque Support.
Associating a user to multiple spaces
You can also add a user to multiple spaces, each with a different role. To do so, provide comma-separated values of the space names and corresponding space roles. For example, you could add a user as Space Member to the Trial space and Space Developer to the DevOps space.
Points to consider:
- If there are multiple spaces and only one role, reuse that role in all specified spaces.
- If there are multiple roles for the same space, use the first valid one.
- If the role name is invalid (unknown value in Torque), assign the Space Member role.
- If there are more spaces than roles, assign Space Member to the extra spaces.
- If there are more roles than spaces, ignore those extra roles.
- If the space name is invalid (unknown value in Torque), ignore that space and its corresponding role.
Mapping Torque user groups to IdP groups
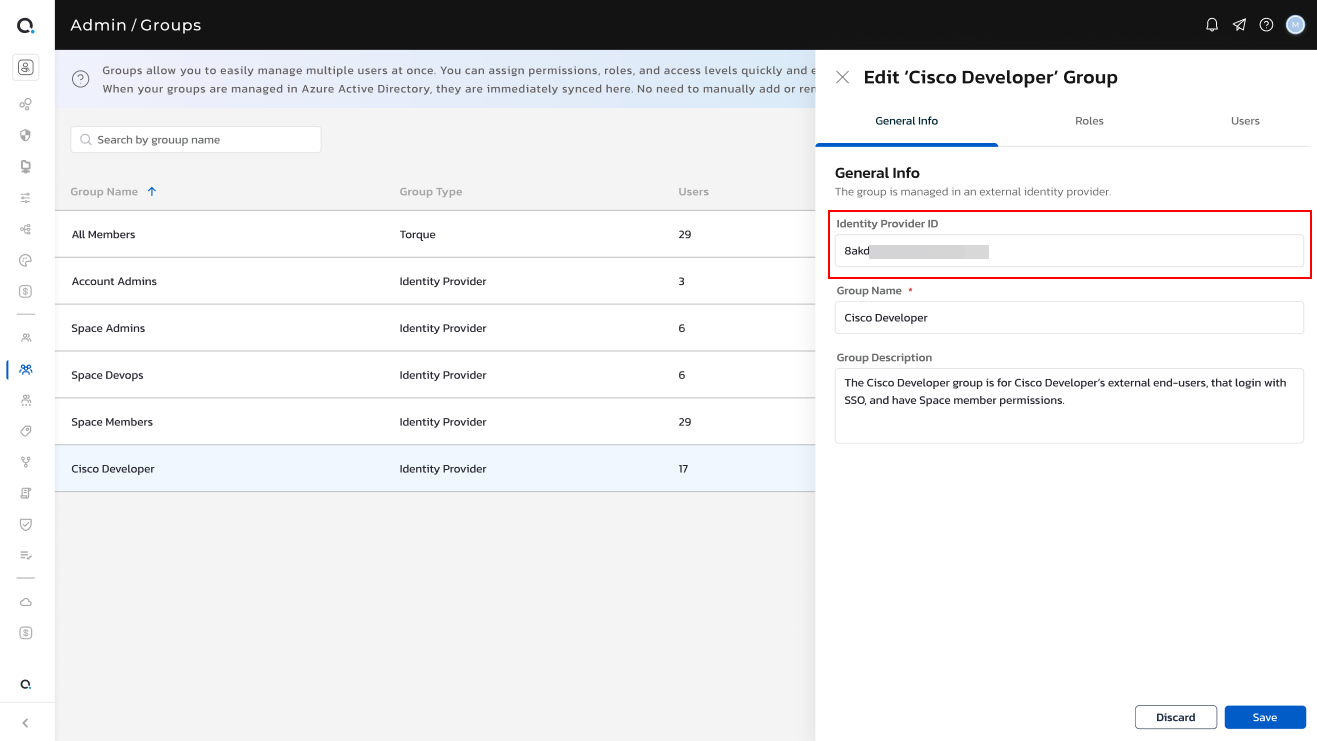
Each group in Torque has an ‘IdP identifier’ field. For SSO users to be assigned to the group automatically, the field must contain the same identifier (usually a GUID) as the group in the IdP (the groups don’t have to have the exact same name)
In Torque, this can be set by editing a group in the ‘Groups’ page under account settings.
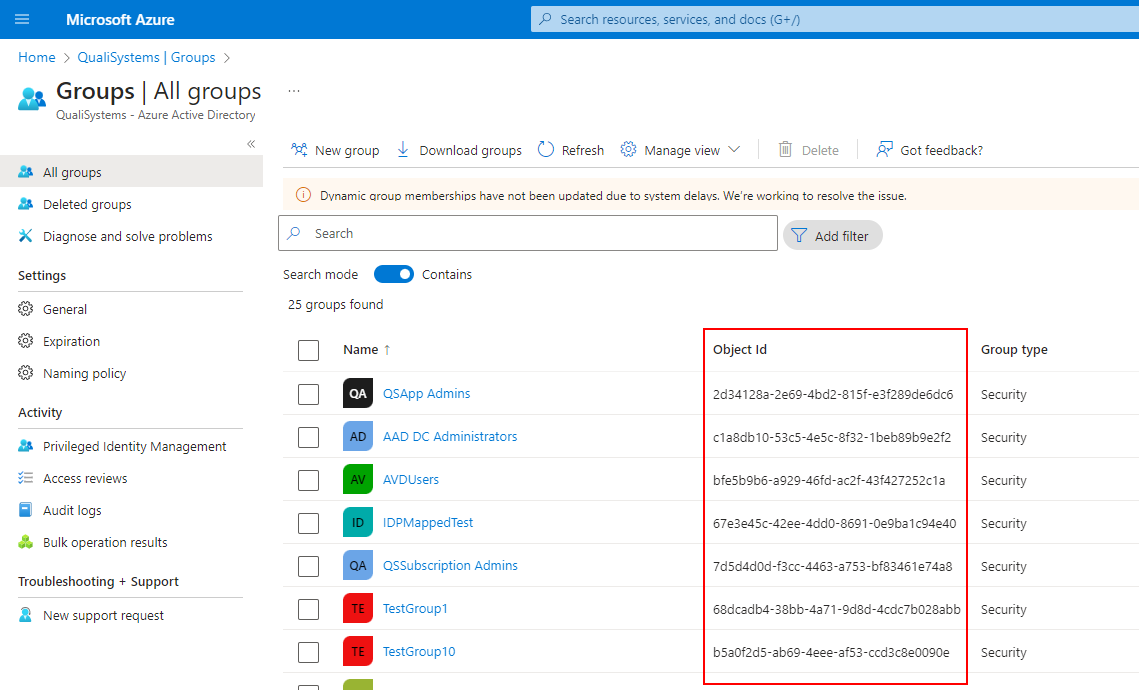
Finding the group identifier in the IdP is specific for each IdP. In the case of Azure Active Directory, this is the ‘Object Id’ field of a group:
For groups that have this field set, users are assigned and unassigned automatically with each login based on the groups they belong to in the IdP.
Users who do not come from an IdP (have a password) or come from an unsupported IdP (all but Okta and Azure AD) can still be added and removed manually from mapped groups.
Configuring Azure Active Directory (Entra) to include group information.
Assuming a working AAD SSO setup, the app in Azure needs to be configured to include the groups additional claim. In ‘App registration’ find the relevant app and go to Token configuration. Add the groups claim (using the default settings)
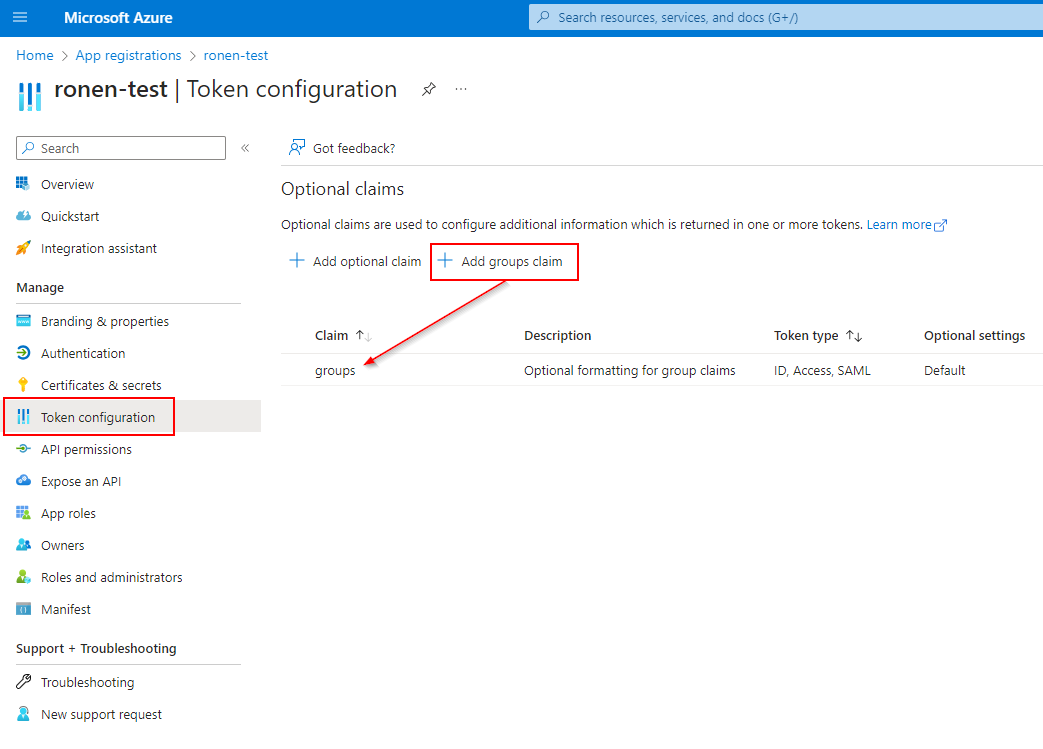
On the next login, users should be assigned automatically to groups they belong to in Azure and are mapped in Torque (note it sometimes takes a short time before the claims start being sent by AAD after this change)
Troubleshooting
If this doesn't work, it is possible to debug the SSO flow from the browser of an authenticated user. open the network tab in the development tools of the browser, check the ‘Preserve log’ option or equivalent and perform an SSO login. one of the calls will be to ‘idp-callback’, inspect the payload of this call.
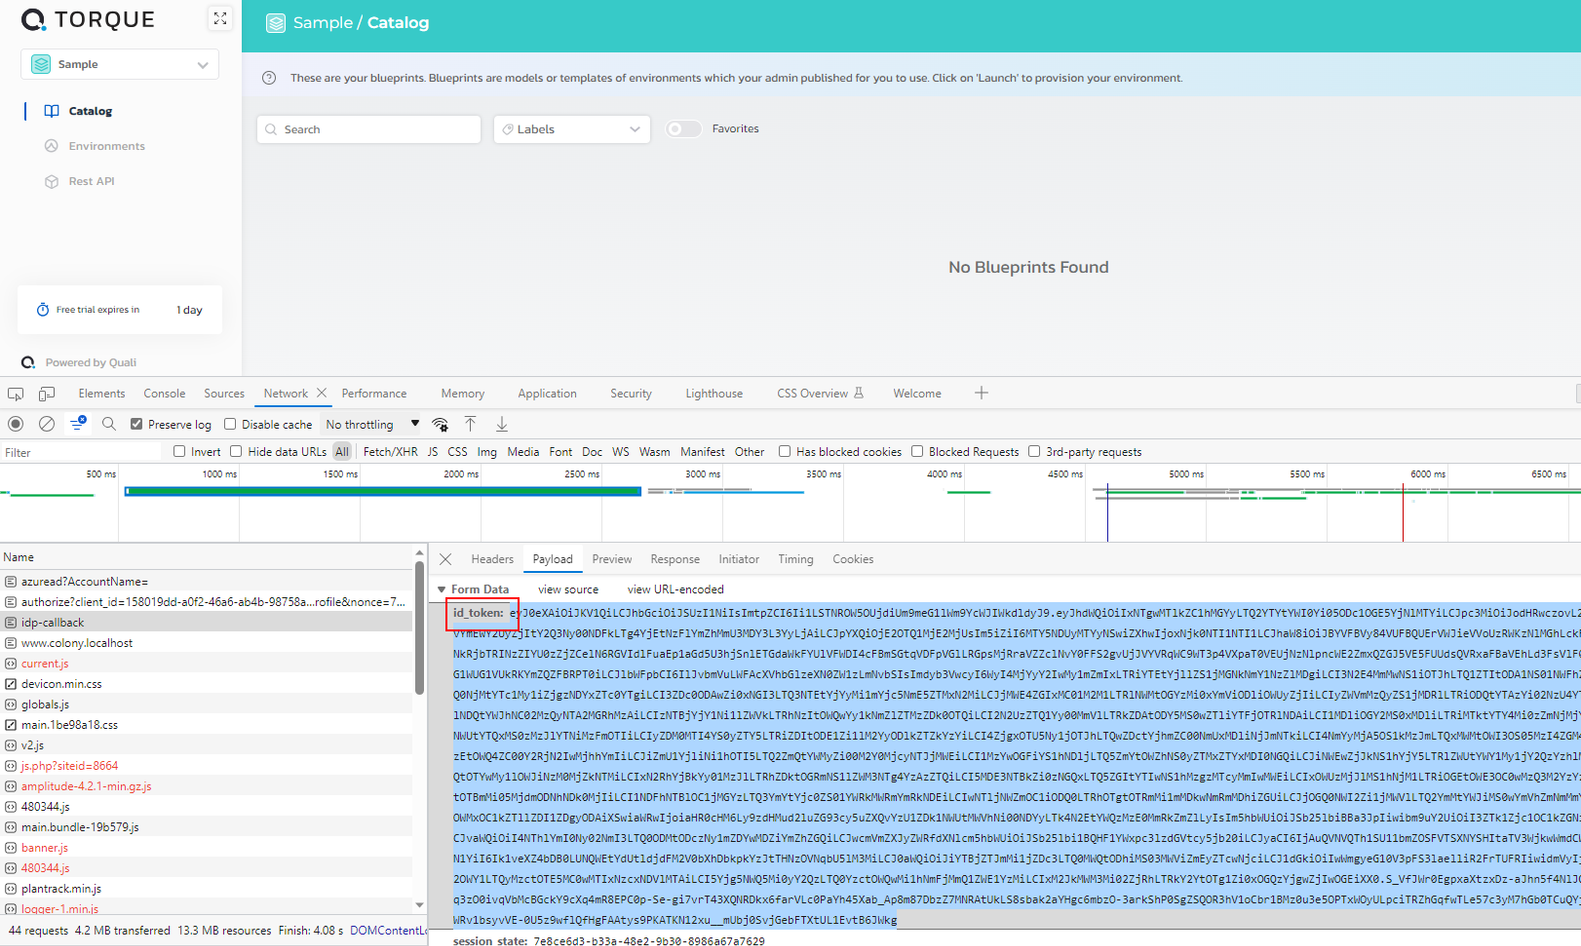
The call should contain an id_token field, the contents is a JWT token containing all the claims (user information) sent from the IdP to Torque (through the browser). Copy the entire contents of this field (without the field name) and paste it into a JWT token decoder (e.d., on https://jwt.io) to view the contents.
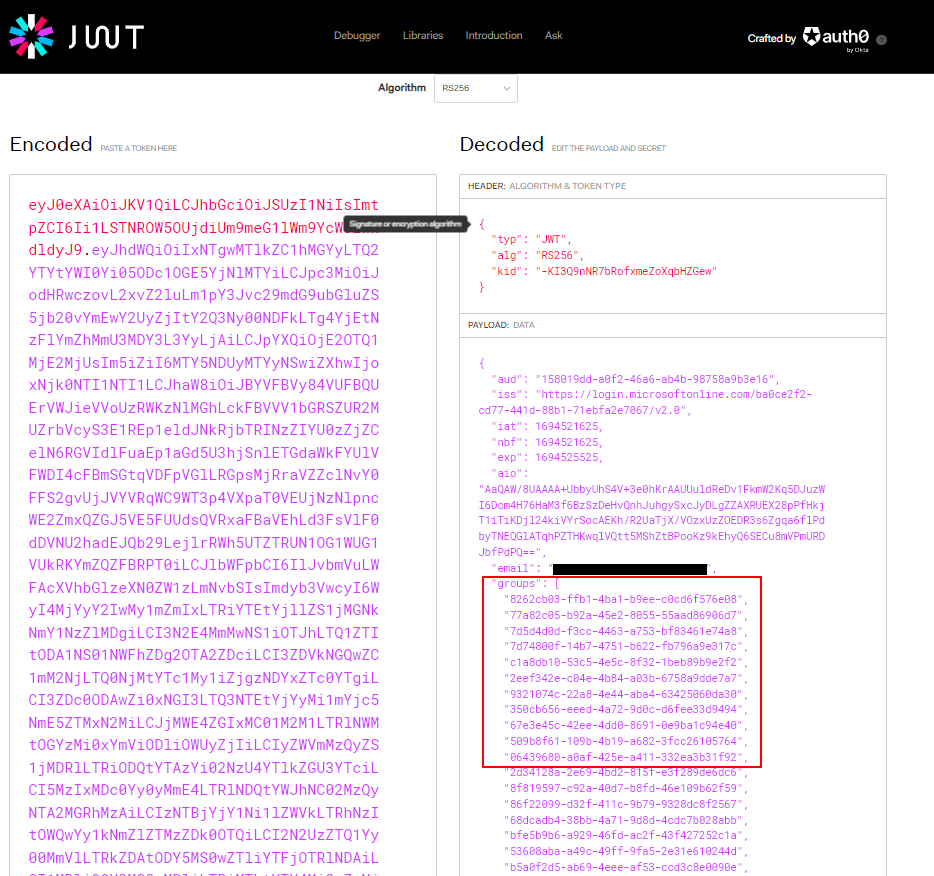
Verify that group information is being included in a format similar to the above or update the app settings in AAD if it’s missing.
You can also look for log entries 'Valid login through AzureAD Idp detected' that should include information about group Ids received from the IdP.
Configuring Okta to include group information.
Assuming a working Okta configuration, to get group sync working we need to have group information passed to Okta from the IdP and forwarded from it to Torque with each user login.
This document will show how this is done when the IdP behind Okta happens to be Azure AD (in a SAML 2 configuration and not the OIDC/JWT flow as above), but it is probably similar for other IdPs.
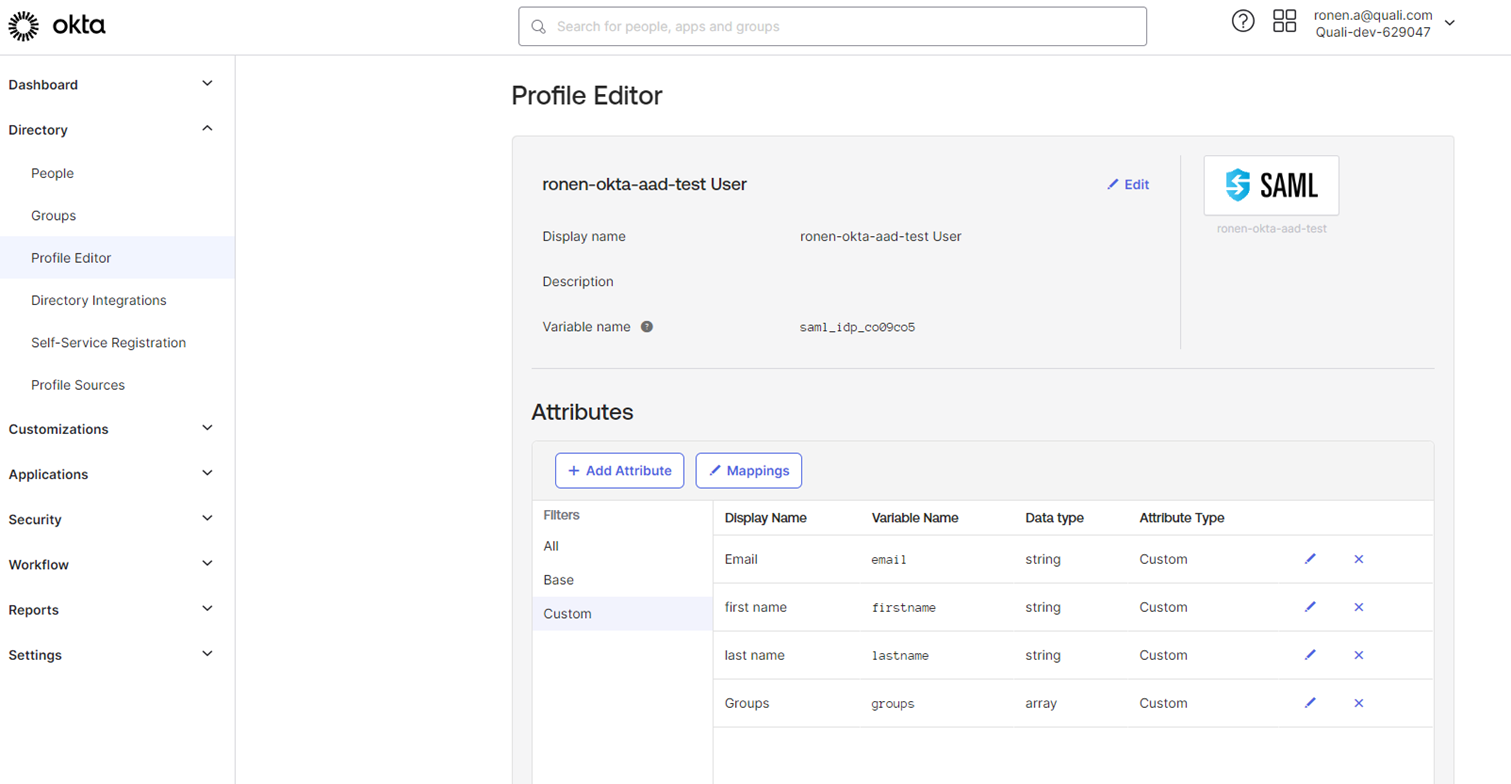
When configuring Azure AD to Okta, you usually set a custom attribute in the profile editor to match the claim coming from the IDP:
Each custom attribute has an ‘external name’:
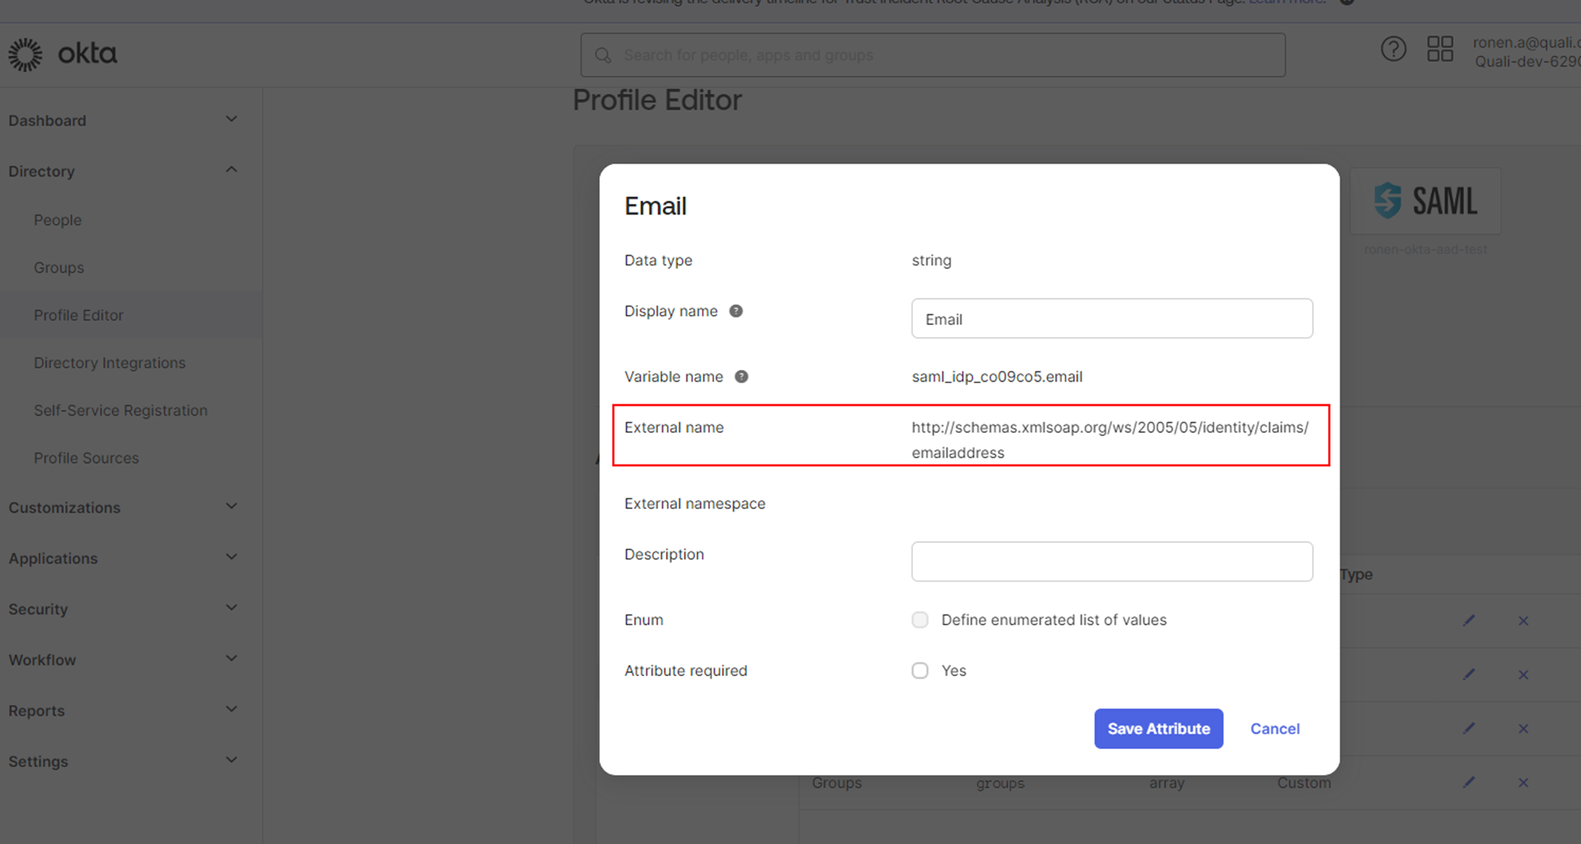
Then click ‘edit on ‘attributes & Claims’ The long URLs (claim names) are what you need to set as ‘external name’ in the attribute in Okta.
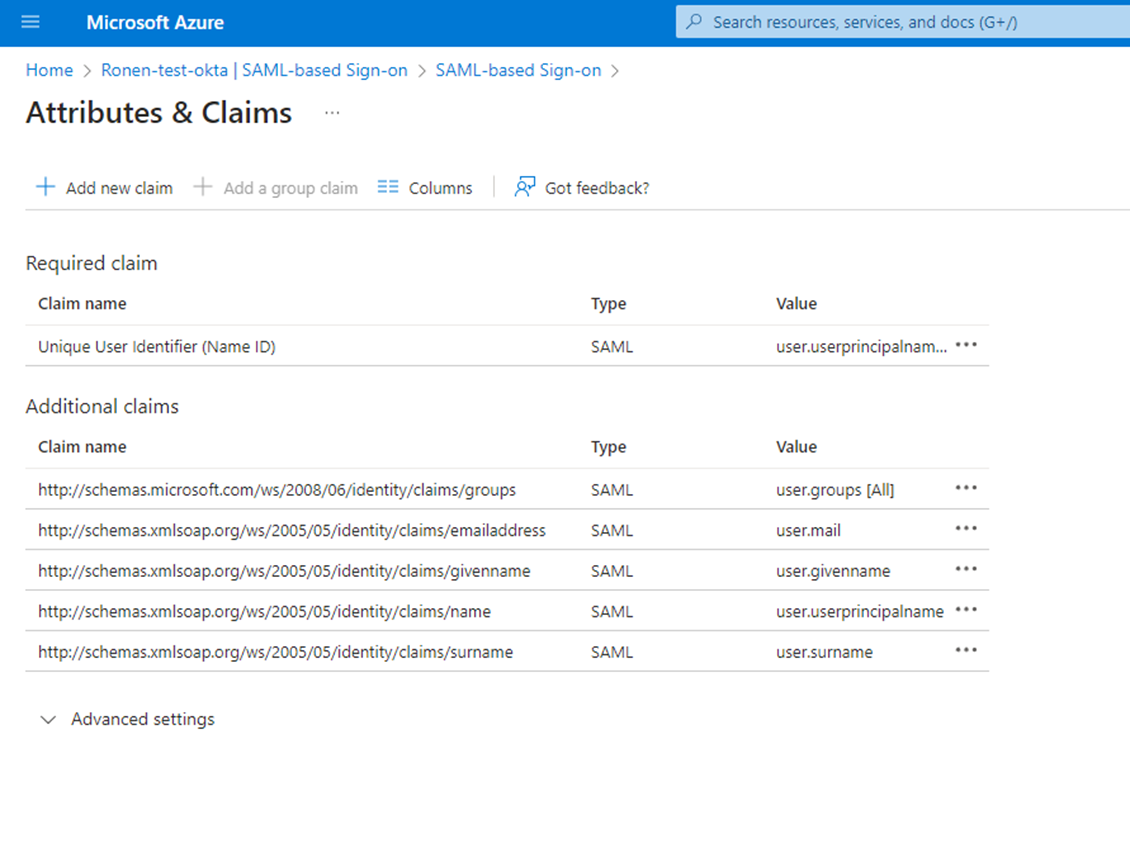
On this screen, you are also able to have Azure AD send group-related information Click the “+Add a group claim” button and use the default setting.
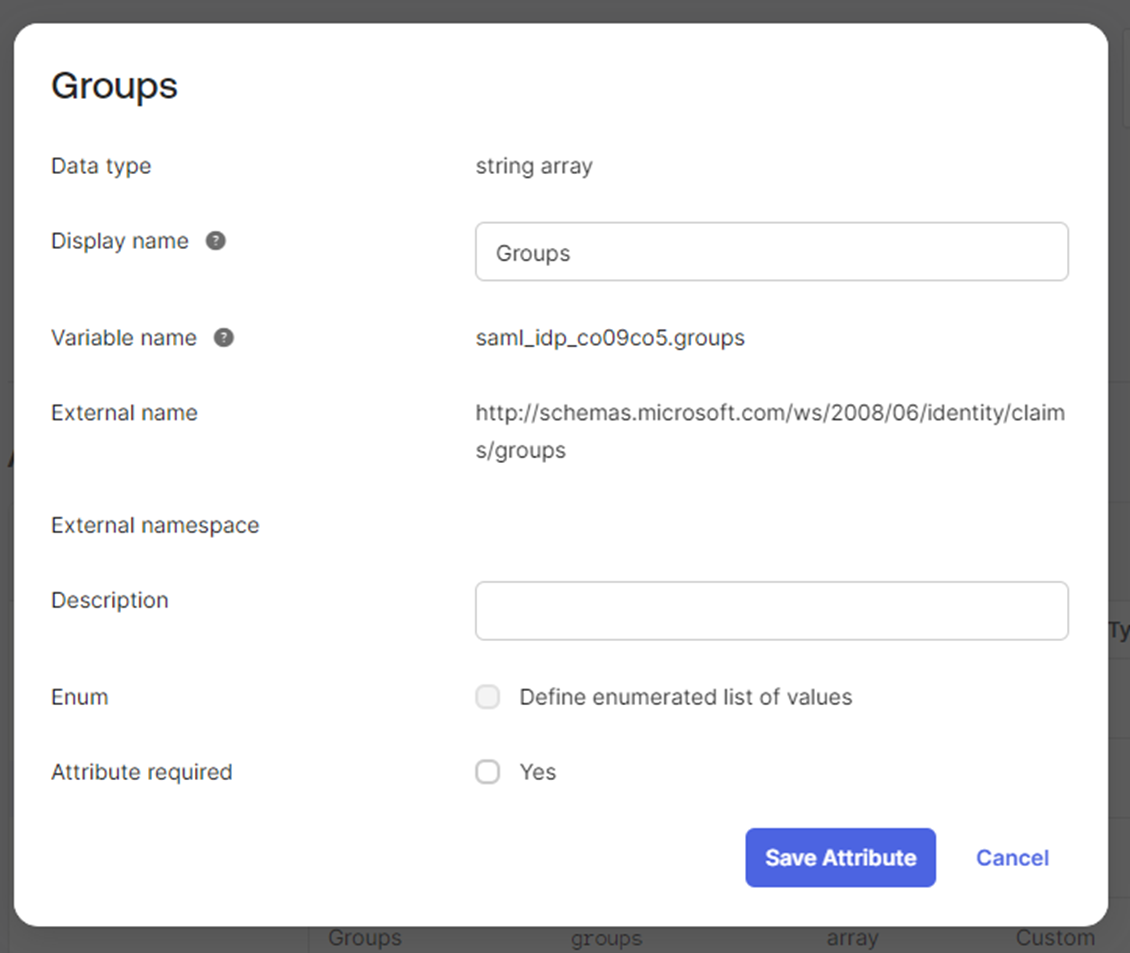
In Okta, create a new attribute in the profile editor for groups (note the type is string array), the external name might be different from the example below.
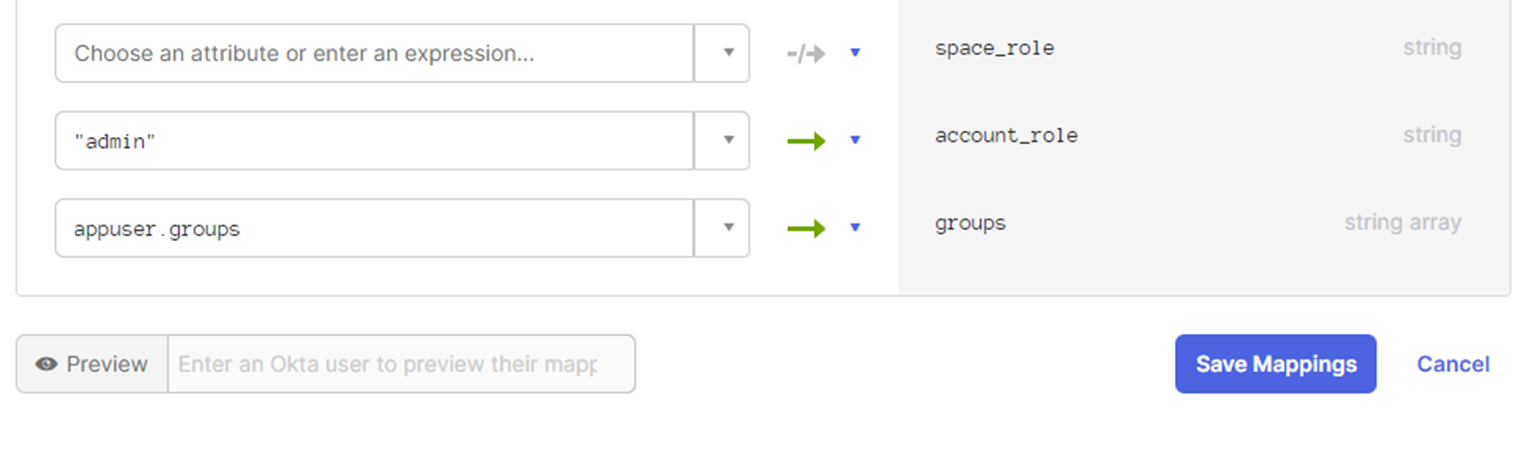
Next, we need to map the groups attribute we just created (that will be filled with group data on login) to a ‘Groups’ field in the user profile that is sent to Torque. Open the ‘mappings’ screen:
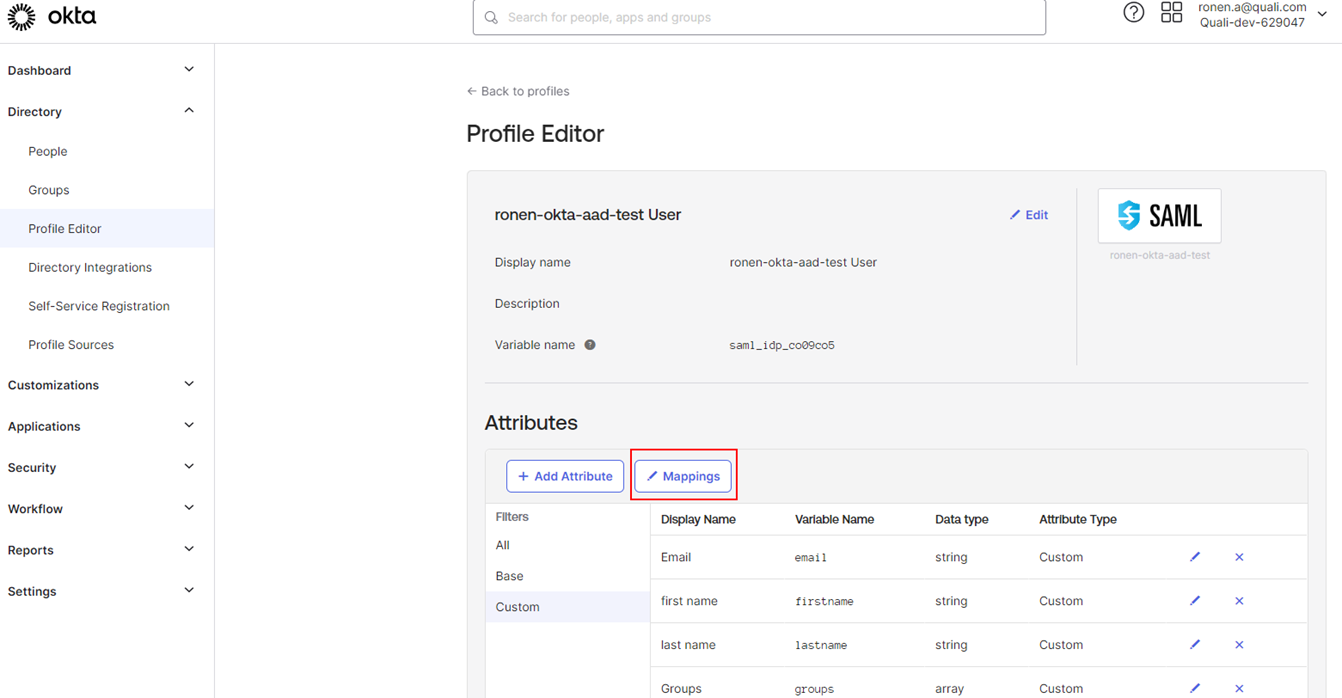
The mapping should include a ‘groups’ field, map to it the attribute we just added (appuser.groups)
Troubleshooting
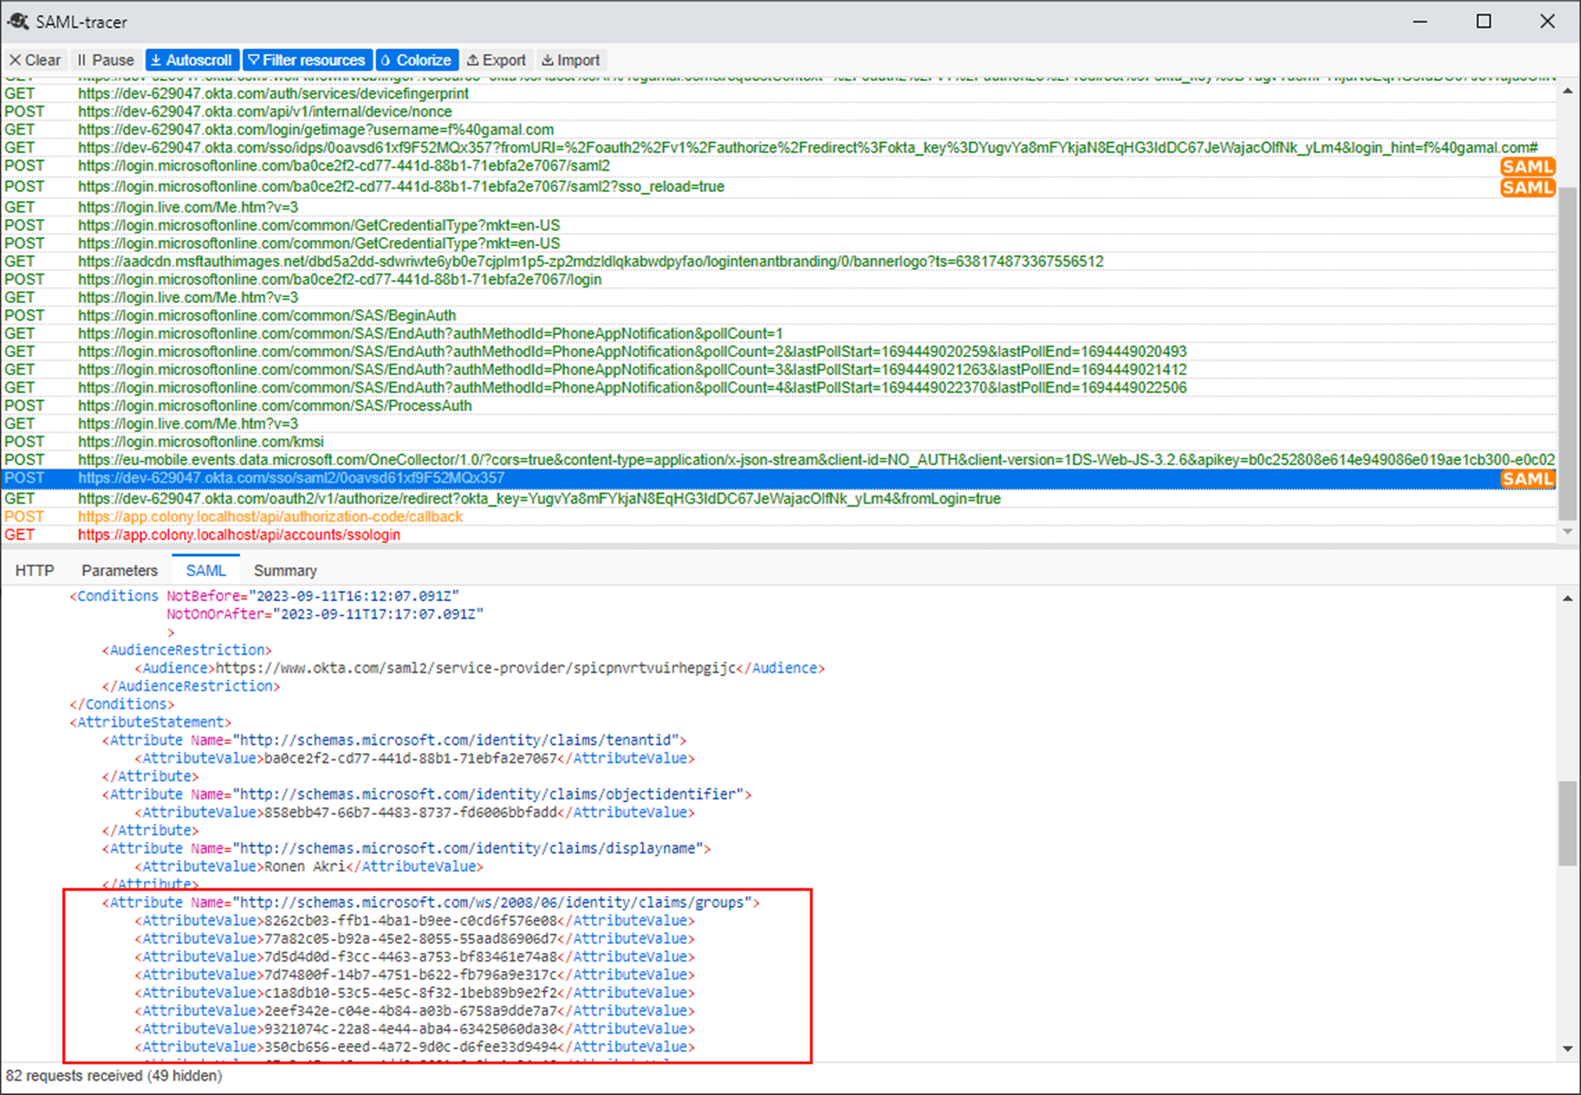
If groups still don’t get sync automatically after this is done, it is possible to inspect the information sent from a browser of an authenticated user using a SAML inspection addon.
This shows what to expect when using SAML-tracer:
User provisioning with SCIM
Torque supports the SCIM protocol for user provisioning and deprovisioning (group provisioning is currently not supported). User provisioning is the ability to create and delete users in your Torque account in real-time as they are created and deleted in the IdP (identity provider). When SCIM is configured, an http call will be issued from the IdP to Torque with each new user that is added or removed from the app on the IdP that is used to manage Torque users in the basic SSO process.
User provisioning with SCIM is optional when configuring SSO. When it is not configured, users can still SSO login normally, and their Torque user will be created "just in time" at the moment of login. details about the user are updated with each subsequent login. There are advantages to configuring User provisioning, though.
- Users are created in Torque when added in the IdP, potentially before their first login. This allows an admin to get a better picture of who the users are in the Torque account and to perform actions on them before the first time they logged in such as already associating them to spaces, setting them as collaborators on some environments, and so on.
- Users are deprovisioned - Normally, when a user is removed from the IdP, they can no longer log in to the Torque account, but the Torque user still appears in the account. Deprovisioning means that once a user cannot SSO into a Torque account, he is removed from it.
The process of user provisioning/deprovisioning is one-directional. Changes to users in Torque do not affect the IdP.
Relation to SSO
User provisioning (SCIM) is an optional component of SSO and can be omitted, as mentioned above, but when active, it would create a new user in Torque to match a user created or associated in the IdP. The new user created is considered 'pending', meaning that this user has never actually logged in before, and also that the only way for that user to log in is via SSO (pending users do not have a password). When that same user later logs in with SSO for the first time, Torque identifies that this is the same user as the one created via provisioning and performs a normal login. When a user is removed from the IdP, they can no longer log in to Torque. If user provisioning was enabled at the time of deletion, then he is deleted from Torque. Regardless, that user can no longer login to the account. The same app in the IdP is used for both SSO (e.g., using SAML) and for user provisioning. Note that while SSO is usually
Configuring user provisioning
In order to set up user provisioning with SCIM, the following is needed.
- SSO is configured and working in the account.
- Access to the IdP and app that is used for SSO.
- A long token from Torque with the account-level permission of "Manage Users" (e.g., a token generated by an account admin)
See Torque API Tokens for generating a token.
The process itself is slightly different for different identity providers, two examples are provided below on how to configure SCIM in Okta and in Azure.
Okta
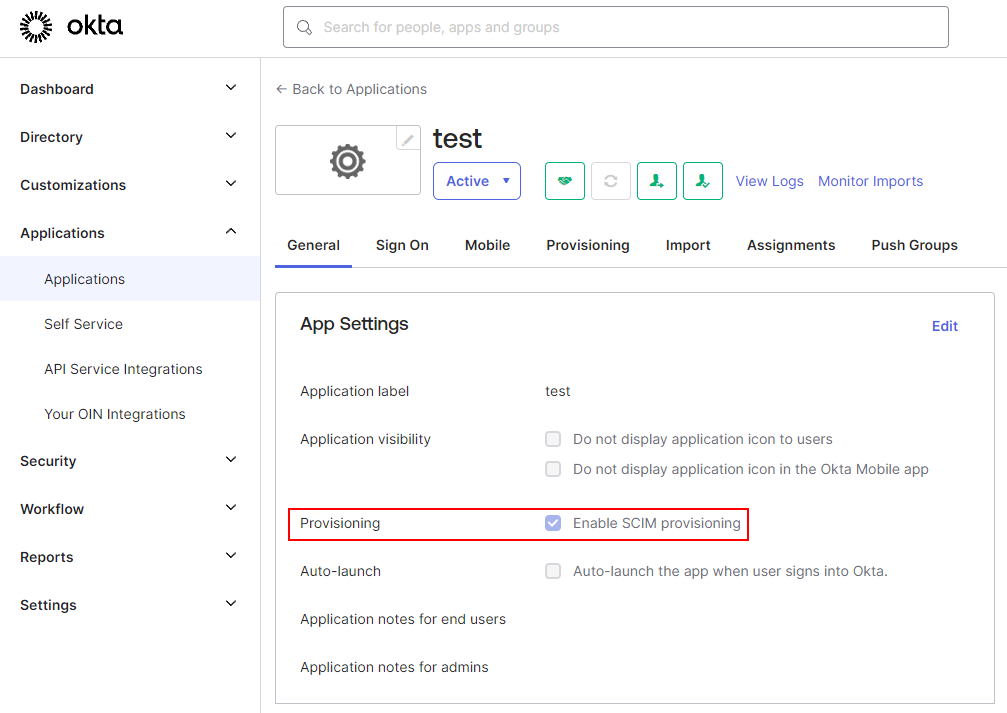
Login to Okta's admin console and locate the application that is used for SSO with Torque under "Applications" and then "Applications" again under it. Under the 'General' tab, set the checkbox on "Enable SCIM provisioning".
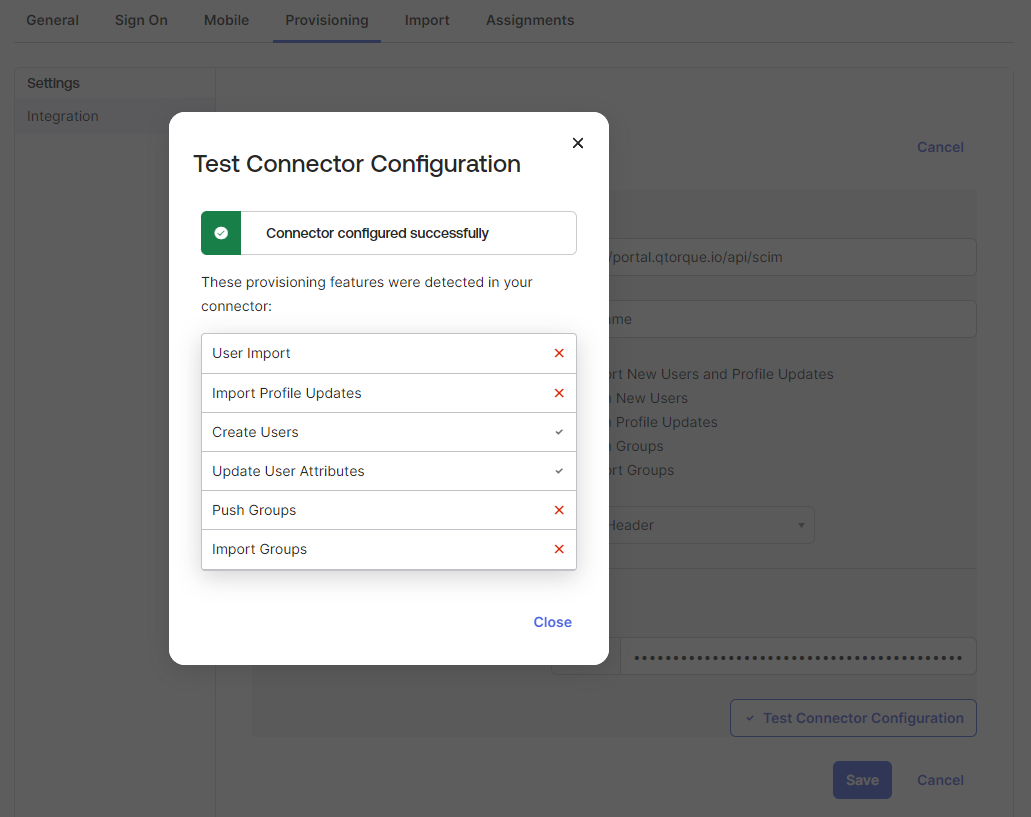
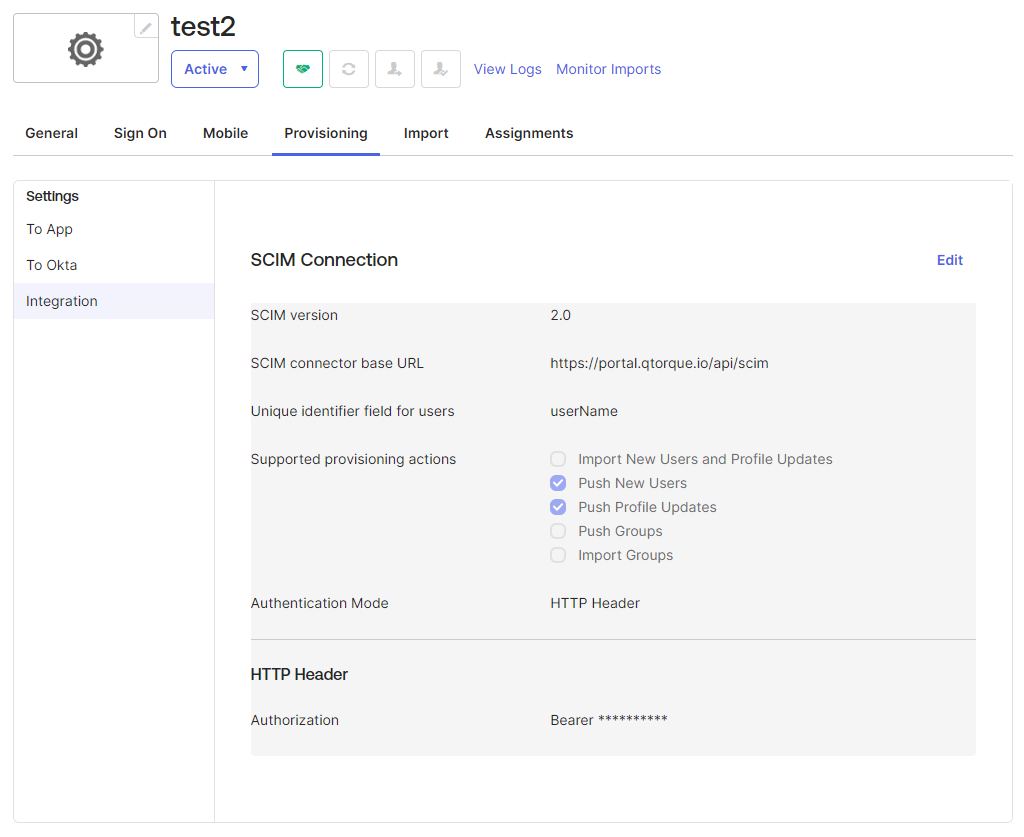
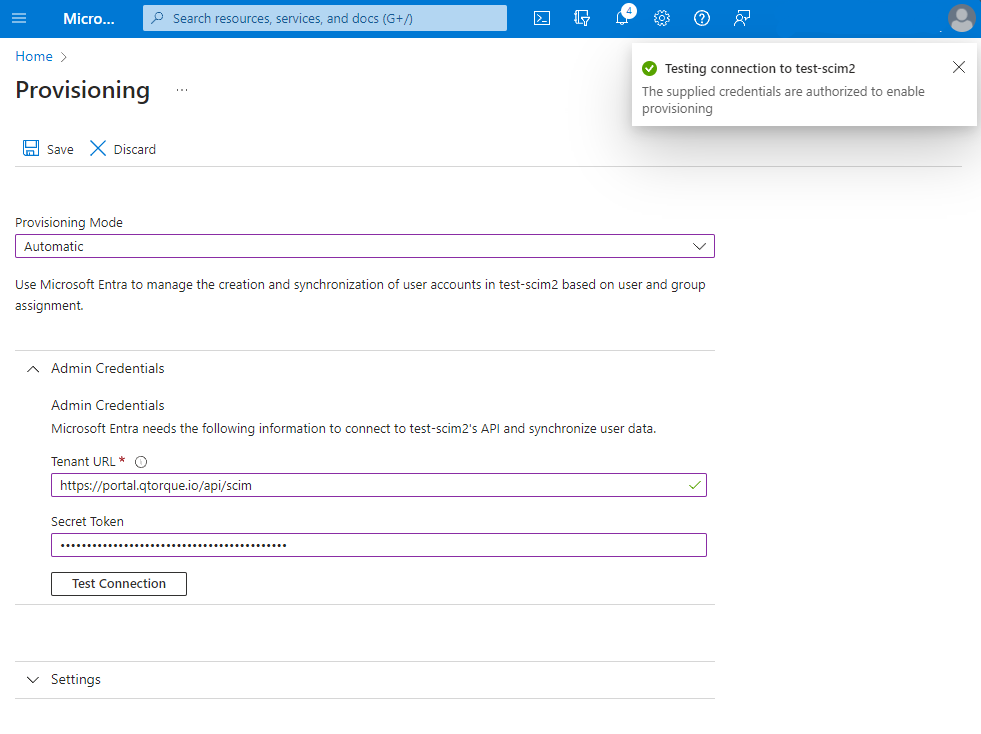
This should cause a new tab to appear on the application named "Provisioning". Navigate to that tab. Under the provisioning tab ('Integration' settings), click edit and set the following: SCIM connector base URL: https://portal.qtorque.io/api/scim Unique identifier field for users: userName Supported provisioning actions: set "Push New Users" and "Push Profile Updates" (the other checkboxes should remain unchecked) Authentication Mode: HTTP header Authorization: This field should contain the long token generated above. Do not include the word "Bearer" if it appears at the start of the token.
Click "Test connector configuration". A screen similar to the one below should appear. If the connection is unsuccessful, an error message appears with additional details.
Click close on the dialog and "Save" on the bottom right button.
The configured Provisioning screen should appear.
Other related settings should remain at their default settings.
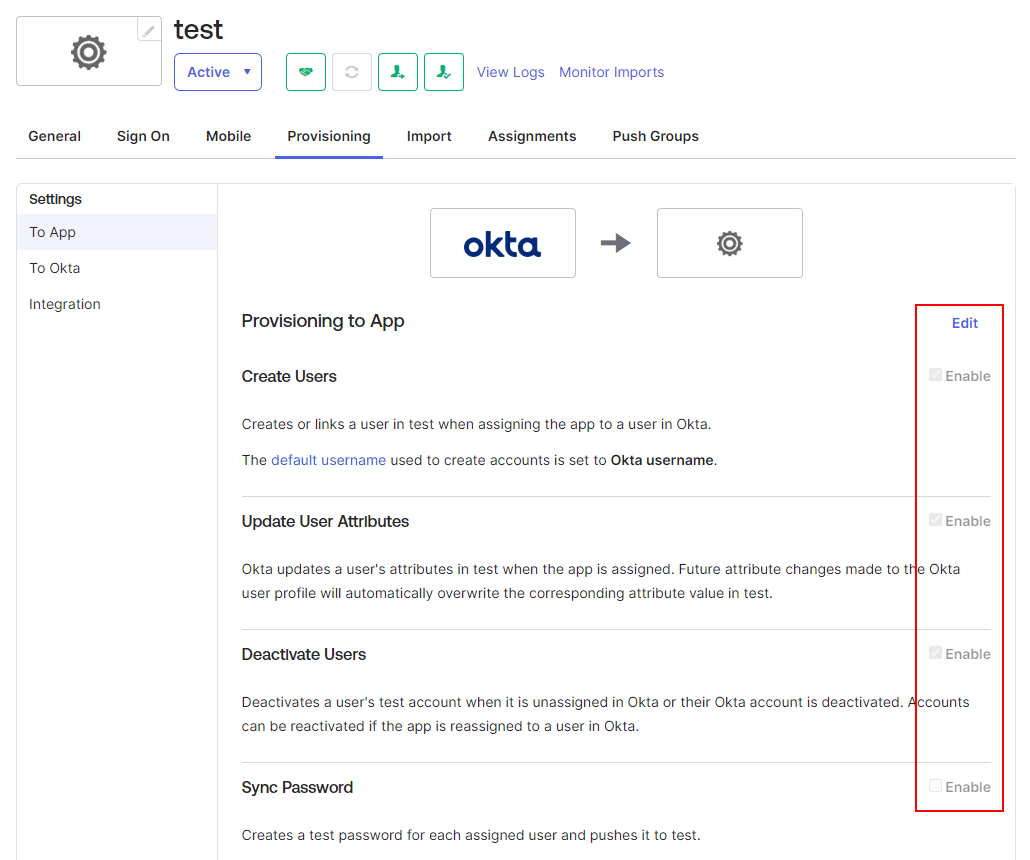
On the left-hand side of the screen, under settings, there is a new tab called "To App", navigate to it. Click 'Edit' under "Provisioning to App" and enable the checkboxes on "Create Users", "Update user attributes", and "Deactivate users". Leave "Sync Password" unchecked. Click Save.
At this point, user provisioning should be working. Associate a user to the app normally (under the "Assignments" tab) and observe that it gets created in the Torque account. in case of an error, a red mark will appear next to the user, this links to the "Dashboard" / "Tasks" page where additional information can be found and the operation can be retried.
Azure Active Directory (Entra)
Log in to Azure and navigate to "Enterprise applications", then locate the application used for SSO with your Torque account. On the left-hand side menu, pick "Provisioning" and click "Get started". Set "Provisioning Mode" to Automatic. Under Admin Credential, set the following. Tenant URL: https://portal.qtorque.io/api/scim Secret Token: This field should contain the long token generated above. Do not include the word "Bearer" if it appears at the start of the token. Click "Test connection", and a message should appear on the top right, confirming a successful connection. If the connection is unsuccessful, an error message appears with additional details.
Click Save and return to the enterprise application. Select "Provisioning" again "Provisioning" again under it (or the Edit provisioning button on the overview screen), a similar screen to the one where we enabled provisioning appears. Expand the "Mappings" section
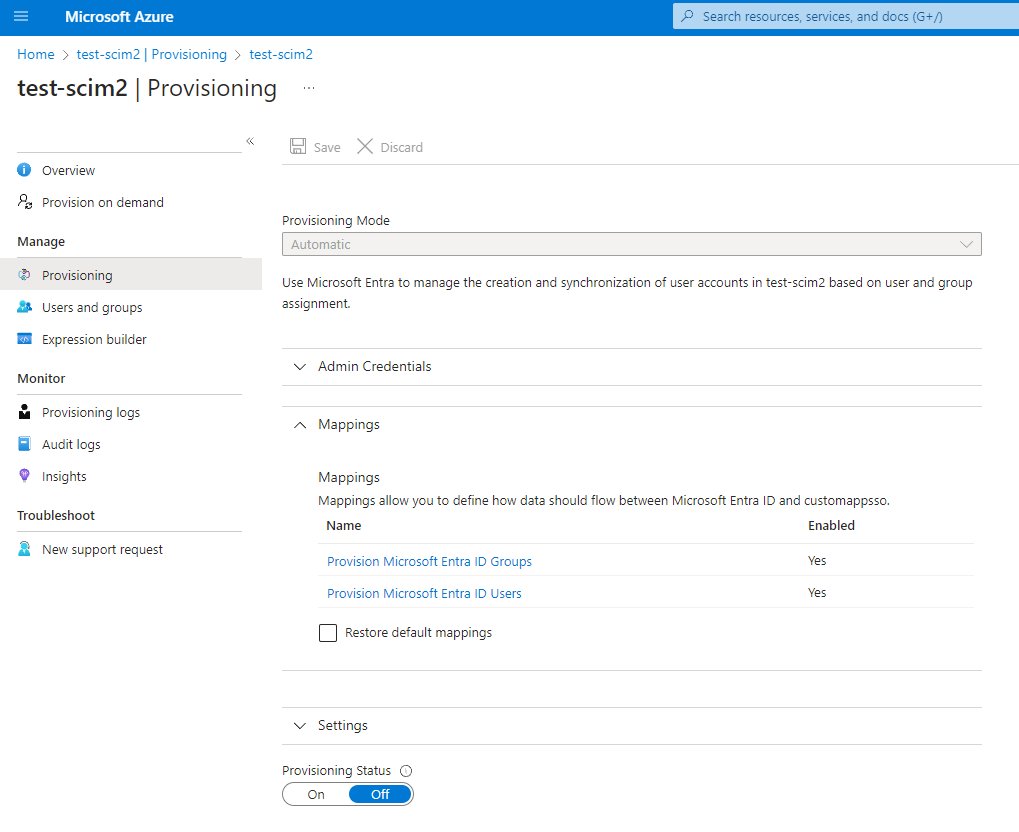
Click "Provision Microsoft Entra ID Groups". In the screen that appears, set "Enabled" to false and click Save. Click the X at the top right to return to the screen in the screenshot above and observe that 'Enabled' is set to No under "Provision Microsoft Entra ID Groups" (May require a refresh)
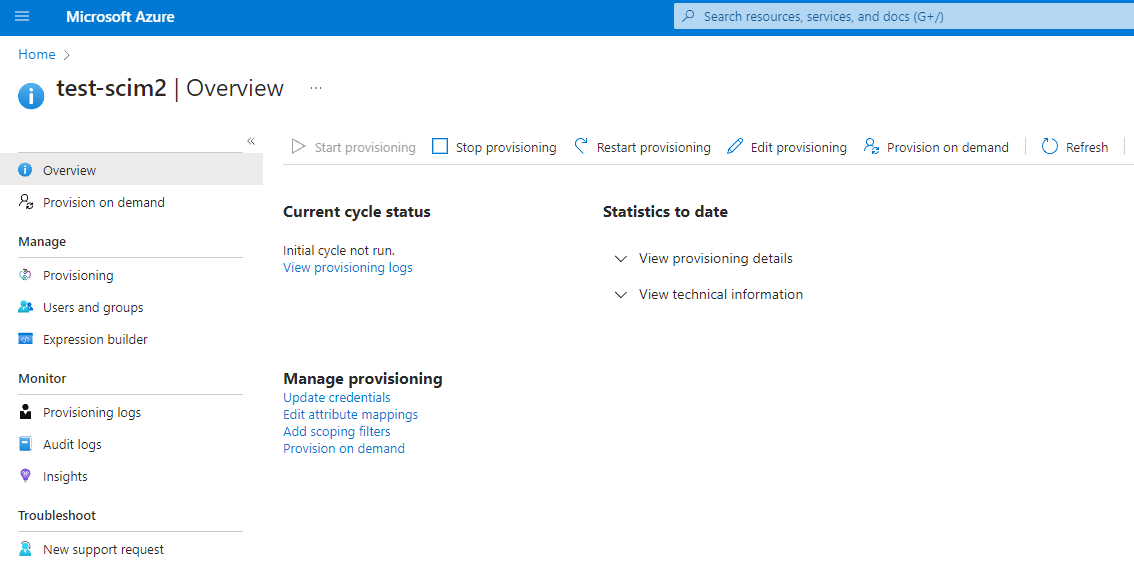
Return to the Overview tab and click "Start provisioning". At this point, user provisioning should be working. Associate a user to the app normally (under the "Users and groups" tab) and observe that it gets created in the Torque account.
- Important note: User provisioning is an offline process in Azure. Changes to user association may take up to 40 minutes to be provisioned. Provisioning logs may also take minutes to show changes.
Configuring Azure AD SSO (OIDC) on Private SaaS
Overview
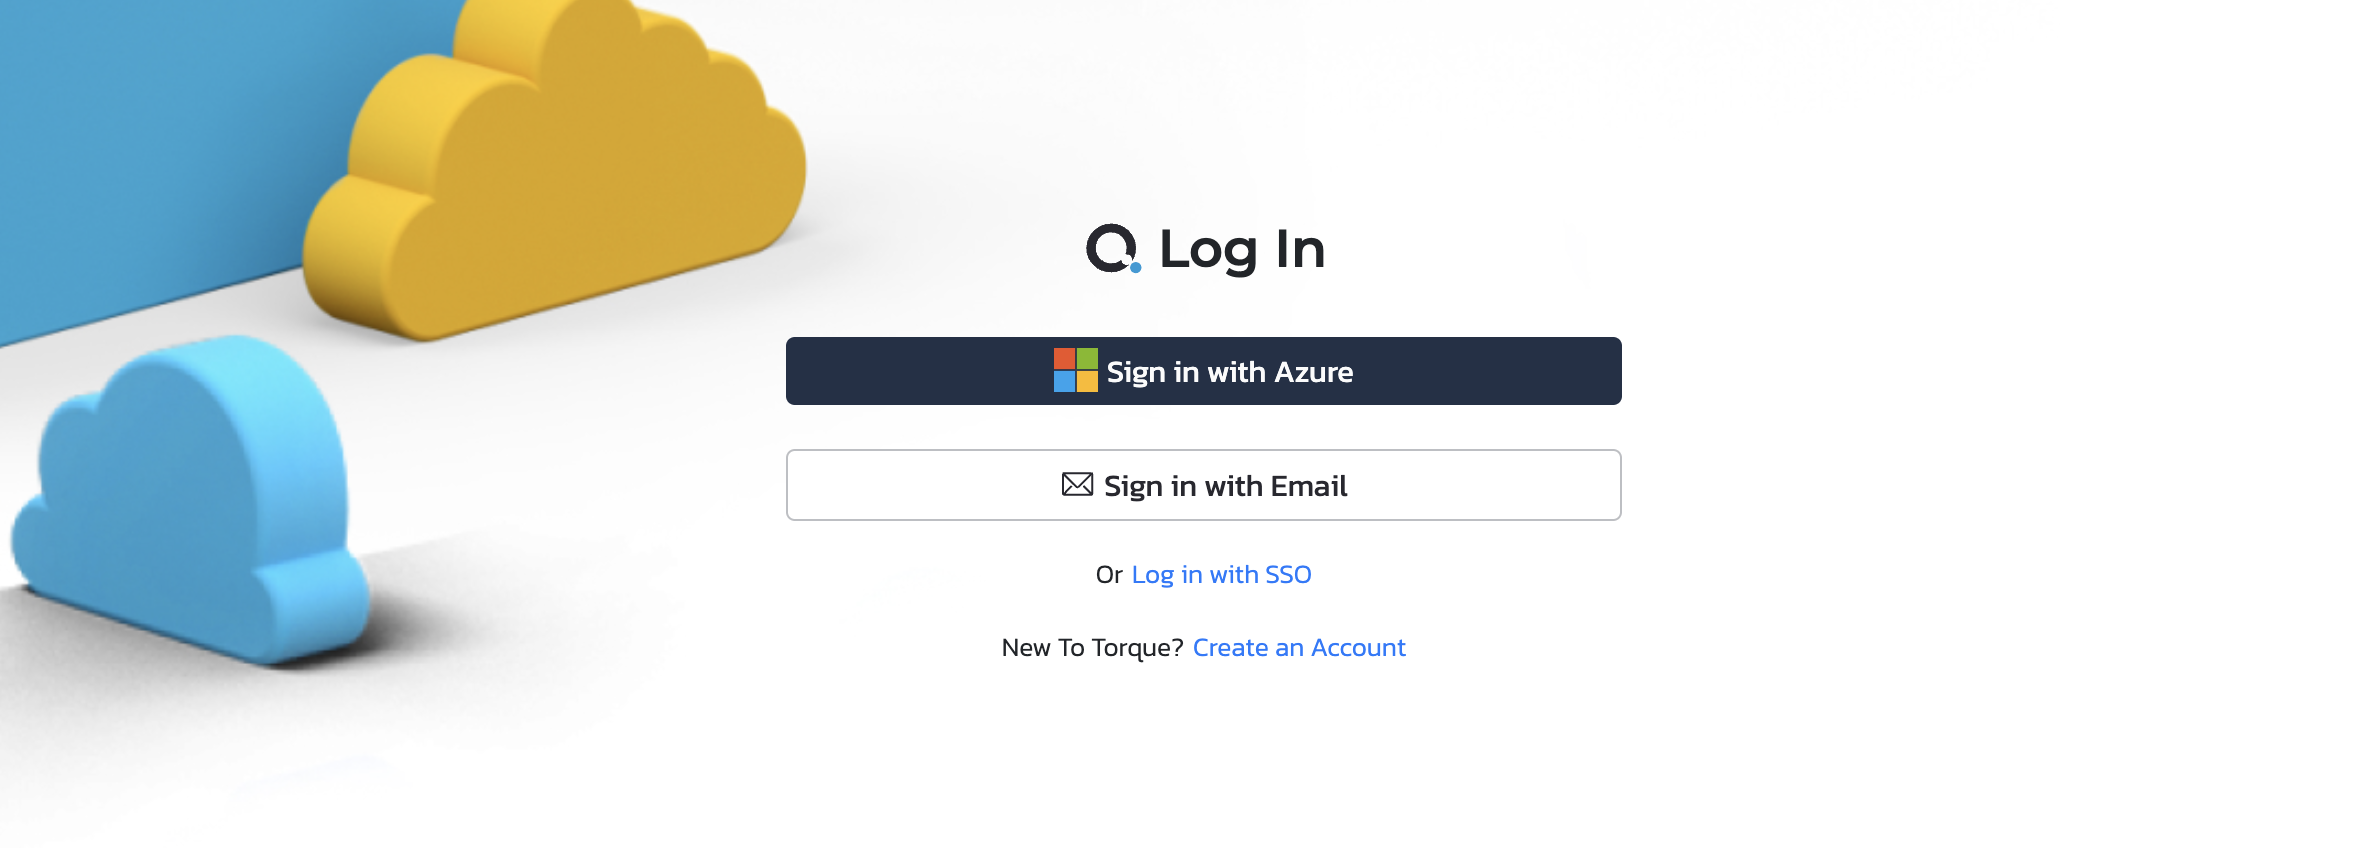
When users navigate to an instance of the private SaaS application with Azure AD single sign-on (SSO) enabled, they will see a 'Sign in with Azure' button.
Clicking this button will redirect them to the configured Azure AD tenant/app where they will be verified. Upon successful verification, users will be redirected back to the application.
On first login, a new user will be created in the application and assigned to a default space with a pre-configured role. The user can then be assigned additional roles in other spaces for subsequent logins.
Prerequisites
- A pre-existing account created with at least one admin user with email login
- The application instance is configured for single tenant or private SaaS usage
Azure AD App Registration
In the Azure portal, go to Azure Active Directory > App registrations Select your app registration and note the Application (client) ID shown under 'Essentials'.
In the app's 'Authentication' section, add a redirect URL matching your application instance URL in the format:
https://your_app_instance.qtorque.io/api/accounts/idp-callback
Configurations needed
To complete the configuration, once successfully registered an AzureAD application, you'll need to provide the following to your Torque Account Manager/Tech support:
Tenant ID: Your Azure AD tenant IDClient ID: The client ID of your Azure AD app registration
Group Synchronization
The Azure AD SSO integration supports synchronizing user groups from Azure AD to the application.
See the Configuring IdP for Synchronizing User Groups documentation for setup details.
With this configuration, users will be able to seamlessly sign in to your private SaaS application using their Azure AD credentials, with new users automatically provisioned with pre-defined roles and spaces.
The group synchronization feature allows mirroring the group assignment from Azure AD.